Unitree RL Lab Official Example Training Guide
This note summarizes the basic workflow for the official Unitree-G1-29dof-Velocity example in the unitree_rl_lab repository. The immediate goal is to get the G1 humanoid example running correctly before moving on to parameter tuning, policy export, and deployment on real hardware.
1. Goal
Run the official velocity-tracking example for the G1 29-DoF humanoid. The core task name is:
Unitree-G1-29dof-Velocity
The minimum acceptance criteria are:
- the G1 robot model loads correctly
- the
Unitree-G1-29dof-Velocitytraining task starts successfully - training can be resumed from a
checkpoint
2. Key prerequisite
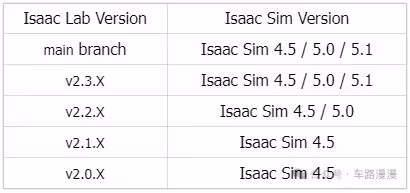
Before starting, make sure that the versions of Isaac Lab and Isaac Sim match. If neither Isaac Sim nor Isaac Lab is installed yet, refer to the installation guide.
Note: Isaac Sim is the underlying simulation platform, built on PhysX. It provides the physical world but is not responsible for training. Isaac Lab is the training framework built on top of Isaac Sim; within the provided physics simulation environment, it defines tasks and trains policies with reinforcement learning to produce .pt files. MuJoCo, by contrast, is another independent physics world. It is used to load the exported ONNX and deploy.yaml files and test whether the policy truly generalizes under different physical dynamics, rather than merely adapting to the specific physics characteristics of Isaac Sim.
3. Clone the official repository
git clone https://github.com/unitreerobotics/unitree_rl_lab.git
cd unitree_rl_lab
4. Install unitree_rl_lab
First activate the environment used for Isaac Lab:
conda activate env_isaaclab
Then run the following command inside the unitree_rl_lab directory:
./unitree_rl_lab.sh -i
After installation completes, open a new shell so that environment variables and shell completion are refreshed correctly.
5. Download robot model assets
The official repository provides two options:
- Option 1: use USD assets
- Option 2: use URDF assets
If the installed versions of Isaac Sim / Isaac Lab are relatively recent, the official recommendation is generally to use the URDF route. A common approach is to clone unitree_ros directly:
git clone https://github.com/unitreerobotics/unitree_ros.git
If unitree_model is used instead, make sure git lfs is enabled:
sudo apt update
sudo apt install git-lfs
git lfs install
git clone https://github.com/unitreerobotics/unitree_model.git
Then edit unitree.py under the unitree_rl_lab directory:
nano source/unitree_rl_lab/unitree_rl_lab/assets/robots/unitree.py
Update the paths so they point to the actual locations on the local machine, for example:
UNITREE_ROS_DIR = "</home/your-name/repos/unitree_ros/unitree_ros>"
UNITREE_MODEL_DIR = "</home/your-name/repos/unitree_usd>"
In unitree.py, different asset-loading modes can be selected for different task models. For example:
UNITREE_G1_29DOF_CFG = UnitreeArticulationCfg(
    spawn=UnitreeUrdfFileCfg(
        asset_path=f"{UNITREE_ROS_DIR}/robots/g1_description/g1_29dof_rev_1_0.urdf",
    ),
    # spawn=UnitreeUsdFileCfg(
    #     usd_path=f"{UNITREE_MODEL_DIR}/G1/29dof/usd/g1_29dof_rev_1_0/g1_29dof_rev_1_0.usd",
    # ),
6. Verify that the task is registered
After installation and asset-path configuration, it is better to confirm task registration before starting training. Run the following command from the unitree_rl_lab directory:
./unitree_rl_lab.sh -l
Under normal conditions, the output should list multiple Unitree-related tasks. The one discussed here is:
Unitree-G1-29dof-Velocity
7. Run the official G1 training example
Once the task appears in the list, training can be launched directly. Run the following command from the unitree_rl_lab repository root:
PYTHONPATH=$PWD/source/unitree_rl_lab python scripts/rsl_rl/train.py \
  --task Unitree-G1-29dof-Velocity \
  --headless
It is usually better to start with headless mode because it places fewer requirements on the local graphical environment and is more convenient for verifying that the training pipeline works end to end.
If training starts successfully, the terminal will print output similar to the following:
################################################################################
                         Learning iteration 3032/52300

                            Total steps: 72056832
                       Steps per second: 85467
                        Collection time: 1.083s
                          Learning time: 0.067s
                        Mean value loss: 0.0059
                    Mean surrogate loss: -0.0096
                      Mean entropy loss: 9.5192
                            Mean reward: 35.93
                    Mean episode length: 995.45
                        Mean action std: 0.35
        Episode_Reward/track_lin_vel_xy: 0.7915
         Episode_Reward/track_ang_vel_z: 0.2411
                   Episode_Reward/alive: 0.1496
    Episode_Reward/base_linear_velocity: -0.0144
   Episode_Reward/base_angular_velocity: -0.0342
               Episode_Reward/joint_vel: -0.1077
               Episode_Reward/joint_acc: -0.0405
             Episode_Reward/action_rate: -0.3637
          Episode_Reward/dof_pos_limits: -0.0013
                  Episode_Reward/energy: -0.0027
    Episode_Reward/joint_deviation_arms: -0.1064
  Episode_Reward/joint_deviation_waists: -0.0595
    Episode_Reward/joint_deviation_legs: -0.0833
     Episode_Reward/flat_orientation_l2: -0.0097
             Episode_Reward/base_height: -0.0004
                    Episode_Reward/gait: 0.5041
              Episode_Reward/feet_slide: -0.0308
          Episode_Reward/feet_clearance: 0.9713
      Episode_Reward/undesired_contacts: -0.0007
              Curriculum/terrain_levels: 0.0424
          Curriculum/lin_vel_cmd_levels: 0.4000
     Metrics/base_velocity/error_vel_xy: 0.4542
    Metrics/base_velocity/error_vel_yaw: 1.0218
           Episode_Termination/time_out: 0.9807
        Episode_Termination/base_height: 0.0000
    Episode_Termination/bad_orientation: 0.0193
--------------------------------------------------------------------------------
                         Iteration time: 1.15s
                           Time elapsed: 00:13:56
                                    ETA: 15:37:30
8. Logs and output files
After training starts, outputs are generally written under logs/rsl_rl/ in the repository root, organized by task name and timestamp.
9. MuJoCo simulation commands
Before launching MuJoCo, you need to convert the trained pt file into an onnx file. This process is not covered here. Then place the onnx file and the deploy.yaml file into their respective directories:
- Put the
onnxfile intounitree_rl_lab/deploy/robots/g1_29dof/config/policy/velocity/v0/exported - Put the
deploy.yamlfile intounitree_rl_lab/deploy/robots/g1_29dof/config/policy/velocity/v0/params
9.1 unitree_mujoco configuration
The MuJoCo configuration file used in this setup is unitree_mujoco/simulate/config.yaml.
A recommended configuration is:
robot: "g1"
robot_scene: "scene_29dof.xml"
domain_id: 0
interface: "lo"
use_joystick: 0
joystick_type: "xbox"
joystick_device: "/dev/input/js0"
joystick_bits: 16
print_scene_information: 1
enable_elastic_band: 1
Notes:
robotmust be set tog1robot_sceneis best set toscene_29dof.xml- this setup uses a keyboard rather than a gamepad, so
use_joystick: 0 - switching input from a joystick to a keyboard is outside the scope of this note
9.2 Launch MuJoCo
cd /home/your-name/repos/unitree_mujoco/simulate/build
./unitree_mujoco
9.3 Launch the controller
Open another terminal and run:
cd /home/your-name/repos/unitree_rl_lab/deploy/robots/g1_29dof/build
./g1_ctrl --network lo
If communication is working correctly, the g1_ctrl terminal should show something like:
Connected to robot.
FSM: Start FixStand
9.4 What to do after launch
This is one of the easiest places to get confused. It is important to distinguish which key works in which window.
9.5 Keys in the MuJoCo window
These keys only work when the MuJoCo window has focus:
8or the down arrow keyDown- increase the elastic-band length so the robot lowers gradually
9- toggle the elastic band on or off
Notes:
- pressing
8does not make the robot drop to the ground immediately; each press increases the elastic-band length incrementally - if
9is pressed before the robot is actually bearing weight, it may fall directly
9.6 Keys in the g1_ctrl terminal
These keys are not pressed in the MuJoCo window. They are entered in the terminal that is running ./g1_ctrl:
Wmove forwardSmove backwardAmove leftDmove rightQturn leftEturn right
10. Common issues
10.1 Unitree-G1-29dof-Velocity does not appear in the task list
First check whether the correct Isaac Lab environment is active and whether unitree_rl_lab has actually been installed into the current Python environment.
10.2 Robot model loading fails
Start by checking UNITREE_ROS_DIR or UNITREE_MODEL_DIR. In most cases, the problem is an incorrect path rather than a code issue.
10.3 The first launch is unusually slow
The first run of an Isaac Lab / Isaac Sim task may spend considerable time on shader caching, asset initialization, and extension loading. That does not necessarily mean the process is stuck.
11. Pitfall notes
11.1 Wrong training working directory
It is easy to assume that the training command should be run from the directory containing source/.../__init__.py, but that location is where the environment is registered, not the runtime entry point.
Training, replay, and task-list commands should all be executed from the unitree_rl_lab repository root, which is the directory that contains unitree_rl_lab.sh, scripts/, and source/:
cd unitree_rl_lab
11.2 Incorrect use of the -p argument
If the following command is used:
./unitree_rl_lab.sh -p scripts/rsl_rl/train.py
the result will be an error similar to:
play.py: error: unrecognized arguments
In the official repository, -p is used for play mode rather than for passing a script path. The training script should be invoked directly with Python:
python scripts/rsl_rl/train.py --headless --task Unitree-G1-29dof-Velocity
11.3 unitree_rl_lab package not loaded correctly
If running the script directly produces:
ModuleNotFoundError: No module named 'unitree_rl_lab'
that usually means the current Python environment cannot resolve the unitree_rl_lab package correctly.
The recommended first step is an editable install:
pip install -e source/unitree_rl_lab
11.4 unitree_rl_lab.tasks module loading failure
If the following error continues to appear:
No module named 'unitree_rl_lab.tasks'
that usually does not mean the package is missing. More often, PYTHONPATH is pointing at the wrong directory level.
For this repository, a more reasonable temporary command is:
PYTHONPATH=$PWD/source/unitree_rl_lab python scripts/rsl_rl/train.py --headless --task Unitree-G1-29dof-Velocity
If this workflow needs to be kept long term, an editable install is still preferable to relying permanently on a manually set PYTHONPATH.
11.5 Incorrect UNITREE_MODEL_DIR path configuration
When configuring the G1 asset path, if UNITREE_MODEL_DIR is set to a specific .usd file instead of the model root directory, path concatenation errors will occur. The error message often looks like:
...g1_29dof_rev_1_0.usd/G1/29dof/...
The reason is that the code appends subpaths to UNITREE_MODEL_DIR. This variable therefore needs to point to the model root directory rather than to an individual file.
11.6 Errors when loading USD files
11.6.1 Contact-sensor-related error
When loading a custom USD file, the following error may appear:
No contact sensors added to the prim
Although the error is raised from contact-sensor-related logic, in this setup the more likely root cause is a version and interface mismatch between the unitree_rl_lab training script and rsl-rl 5.0.1. The practical fix is to add compatibility handling for rsl-rl 5.0.1. Two changes are required.
Step 1: add legacy configuration compatibility handling in train.py.
Path: scripts/rsl_rl/train.py
Below """Rest everything follows.""", after AppLauncher starts, change the code to:
app_launcher = AppLauncher(args_cli)
simulation_app = app_launcher.app

# Add the following content
from isaaclab_rl.rsl_rl import (
    RslRlOnPolicyRunnerCfg,
    RslRlVecEnvWrapper,
    handle_deprecated_rsl_rl_cfg,
)
Then, after the following line in main():
agent_cfg = cli_args.update_rsl_rl_cfg(agent_cfg, args_cli)

# Add the following content
agent_cfg = handle_deprecated_rsl_rl_cfg(agent_cfg, installed_version)
Step 2: add obs_groups in rsl_rl_ppo_cfg.py.
Path: source/unitree_rl_lab/unitree_rl_lab/tasks/locomotion/agents/rsl_rl_ppo_cfg.py
Add the following line to BasePPORunnerCfg:
obs_groups = {"actor": ["policy"], "critic": ["policy"]}
This line can be placed near experiment_name or policy, for example:
@configclass
class BasePPORunnerCfg(RslRlOnPolicyRunnerCfg):
    num_steps_per_env = 24
    max_iterations = 50000
    save_interval = 100
    experiment_name = ""
    empirical_normalization = False
    obs_groups = {"actor": ["policy"], "critic": ["policy"]}
    policy = RslRlPpoActorCriticCfg(
        init_noise_std=1.0,
        actor_hidden_dims=[512, 256, 128],
    )
11.6.2 Standard deviation error in the action distribution
Problem description: this issue has only been observed when training the go1-velocity task on an RTX 5090. The same configuration trains normally on the quadruped setup. The workaround below is worth trying, but it is not guaranteed to resolve the problem.
During training, an error may occur if the standard deviation becomes negative:
RuntimeError: normal expects all elements of std >= 0.0
Set the environment variable HYDRA_FULL_ERROR=1 for a complete stack trace.
The default configuration uses noise_std_type="scalar". After migration to rsl_rl 5.0.1, this parameter may be updated by gradients during PPO training and can fall below 0. Once that happens, torch.normal raises the std >= 0.0 error.
Path: source/unitree_rl_lab/unitree_rl_lab/tasks/locomotion/agents/rsl_rl_ppo_cfg.py
In BasePPORunnerCfg, replace the original policy with:
    policy = RslRlPpoActorCriticCfg(
      init_noise_std=1.0,
      noise_std_type="log",
      actor_obs_normalization=False,
      critic_obs_normalization=False,
      actor_hidden_dims=[512, 256, 128],
      critic_hidden_dims=[512, 256, 128],
      activation="elu",
      )
Note: if training has already failed because the standard deviation dropped below 0, updating policy alone does not allow that run to resume. In that case, either restart training from scratch or convert the checkpoint to the new format before resuming.
12. Supplement: task launch, GPU selection, and resume training
12.1 Standard launch
If the goal is simply to start Unitree-G1-29dof-Velocity, run:
PYTHONPATH=$PWD/source/unitree_rl_lab python scripts/rsl_rl/train.py \
  --task Unitree-G1-29dof-Velocity \
  --headless
If a local graphical environment is available and the training window needs to be observed, --headless can be omitted.
12.2 Select a specific GPU
If the machine has multiple GPUs, CUDA_VISIBLE_DEVICES can be used to control which physical GPU is exposed to the current process. For example:
CUDA_VISIBLE_DEVICES=0 PYTHONPATH=$PWD/source/unitree_rl_lab python scripts/rsl_rl/train.py \
  --task Unitree-Go2-Velocity \
  --headless \
  --device cuda:0

CUDA_VISIBLE_DEVICES=1 PYTHONPATH=$PWD/source/unitree_rl_lab python scripts/rsl_rl/train.py \
  --task Unitree-G1-29dof-Velocity \
  --headless \
  --device cuda:0
Points to note:
CUDA_VISIBLE_DEVICES=1means physical GPU1is exposed to the current process--device cuda:0should not be changed here; it means device0within the process-visible device list
This pattern is useful for manually placing training jobs on specific GPUs in a multi-GPU machine, but it is still single-process, single-GPU training rather than distributed multi-GPU training.
12.3 Resume training
If training is interrupted, or if training needs to continue from existing weights, use --resume, --load_run, and --checkpoint. For example:
CUDA_VISIBLE_DEVICES=1 PYTHONPATH=$PWD/source/unitree_rl_lab python scripts/rsl_rl/train.py \
  --task Unitree-G1-29dof-Velocity \
  --headless \
  --device cuda:0 \
  --resume \
  --load_run "2026-03-27_21-17-37" \
  --checkpoint "model_2300.pt"
The parameters mean:
--resume: continue training from an existing run--load_run: specify the run directory to load--checkpoint: specify the model file to restore
The corresponding run directory and model files can usually be found under logs/rsl_rl/<task-name>/<timestamp-directory>/.
12.4 Resuming other tasks
The same method also applies to other tasks. For example, to continue training Unitree-Go2-Velocity:
CUDA_VISIBLE_DEVICES=0 PYTHONPATH=$PWD/source/unitree_rl_lab python scripts/rsl_rl/train.py \
  --task Unitree-Go2-Velocity \
  --headless \
  --device cuda:0 \
  --resume \
  --load_run "2026-03-27_20-59-40" \
  --checkpoint "model_300.pt"
Note that --task, --load_run, and --checkpoint must match each other. Training outputs from different tasks should not be mixed.
Reference materials: